|
Reference Materials
FAQ
Glossary
Start Here
Sign-in to OnRamp
Pre-Tutorial Setup Process
Introduction
Content Management
Advanced Content Management
Distribution System
|
|
|
|
Lesson: Entering Metadata and Saving
General Information About Fields
There are several types of fields.
- Text
- These textboxs can be a single line or multiple lines. Text can be entered directly in the textbox.

|
| Note:
|
| Most text fields can hold html. Two exceptions to this are the Title field and the Abstract Summary field. Placing html in these fields will cause the Record to display incorrectly because the values of these fields are placed in <meta> tags in the view record page header.
|
- Multiple Values
- This is also a text field, but when you begin to fill information into the textbox, another textbox for that field appears. An example of this is the Keywords field.
- Checkbox
- This is a simple field that is either checked or not.
- Selection
- When the field lists values, you can select the value by clicking the desired value in the list. Some selection fields allow for multiple values to be selected. To select multiple values, use the <CTRL> key when you click the second value.
- Date
- Date is similar to selection fields except there are three selection lists, one for month, day, and year. Of course, for dates, only one value can be selected per list.
- Controlled Vocabulary
- Allows you to select value(s) from a controlled vocabulary hierarchy.
- Complex
- Several fields have a complex widget that helps the user to determine the appropriate value. The Author and Editor fields use three input fields to determine the value. More on this when you step through the creation process.
There are two sections at the bottom of the create page, Add Links and Upload Files, that are not used for metadata or text content. We'll see more about these fields in the Content Beyond Metadata section.
Adding Metadata and Content
Let's not forget about Abandon Workflow.

|
| IMPORTANT:
|
| If at any point you decide to stop creating the record, DO NOT navigate away from the creation page using the Back button or one of the navigation links. Instead select the Abandon Workflow button. Otherwise, the new record hangs around in limbo. See Releasing a Locked Record for more information on what to do if you forget to Abandon Workflow.
|
The rest of this lesson takes you through the process of adding remaining metadata and text content...
|
|
| Note:
|
| All fields marked with an * by the field's label are required.
|
Set the Abstract/Summary
How to:
You began the editing process in the previous lesson, Editing a Saved Record. If you missed that lesson, do it now and come back here.
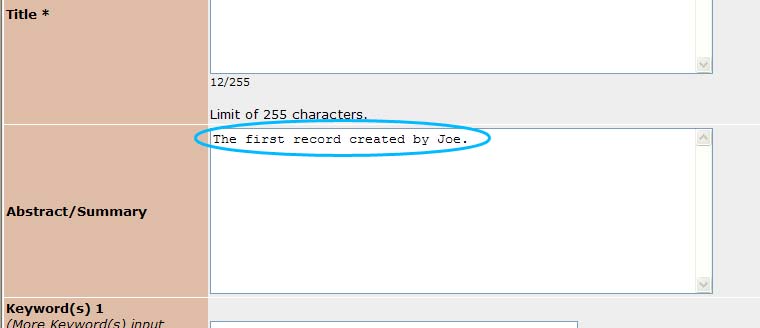
- Type The first record created by your name. Remember not to put any html tags in this field. in the textbox next to Abstract/Summary.
You'll learn more about what happens if you put html in this field in the lesson HTML in Title or Abstract/Summary Fields in the Common Problems section. Avoid the temptation to jump ahead just yet. Once you're done with this page, you can safely jump ahead using the link in the Tutorial's Table of Contents at the left and then pick up the tutorial again in the lesson after this one once your curiosity is satisfied.
Enter Keywords
How to:
- Type tutorial in the textbox next to Keyword(s) 1.
put image here
This is a multiple value field. So as soon as you typed in the Keyword(s) 1 textbox, another textbox appeared to hold the second keyword.

|
| Caution:
|
| Keywords are part of the search system within OnRamp. If you enter multiple words in the same keyword textbox, it is treated as a search phrase. Best practice is to use a single word or simple phrase per keyword textbox.
|
- Type test in the textbox next to Keyword(s) 2.
put image here
Notice that Keyword(s) 3 textbox appeared. This will continue up to 30 keywords.
Set Date
How to:
- From the selection list, choose today's date by selecting the Month, Day, and Year.
put image here
</blockquote>
Set Research Fields, Courses, and Disciplines
This field uses a controlled vocabulary to set its value(s).
How to:
- Click Add Subject button.
|
|
| Note:
|
| The popup shows a list of all controlled vocabularies. The one you want to select typically matches the name of the field for which you are setting values.
|
|
|
| Caution:
|
| If a window didn't pop up, it is possible that the window is hidden behind another window. This can happen if you used a controlled vocabulary earlier and didn't Close the window when done. Use the task bar at the bottom to make the browser window with the title Controlled Vocabulary Selector - OnRamp active.
|
The popup shows the first level vocabulary terms for Research Fields, Courses, and Disciplines. You can either add one of these terms or drill down
farther into the hierarchy.
- To add a vocabulary term, select the vocabulary name and press the Add and Continue button. Select 290000 Engineering and Technology.
- To drill down, either double click the vocabulary name OR select the vocabulary name and press the Show Sub-Categories button. Drill down into Engineering and Technology.
There's nothing in these subjects about software systems. So, back up and try another major topic.
- To back up to a previous level, click the link for the level you want in the bread crumbs at the top. Click the Research Fields, Courses and Disciplines link in the bread crumbs.
- Select 280000 Information, Computer and Communication Sciences.
- Click Add and Continue button.
- View the sub-categories by double clicking 280000 Information, Computer and Communication Sciences.
- View the sub-categories by double clicking 280100 Information Systems. (Notice, this one isn't being added to the field's values.)
- Select 280103 Information Storage, Retrieval and Management.
- Click Show Sub-Categories button.
Notice that there are no subjects listed because there are no sub-categories for 280103 Information Storage, Retrieval and Management.
- Back up one level by clicking the 280100 Information Systems link in the bread crumbs.
- Select 280103 Information Storage, Retrieval and Management.
- Click Add and Continue button.
- Since this is the last subject to add, click the Close button.
put image here
There is an extra subject that isn't correct. To remove it...
- Select 290000 Engineering and Technology.
- Click Remove Subject button.
Set Author
There are 3 fields for Author.
- Author's Full Name -- Top textbox field
- Author ID -- Bottom selection list which has one item (none) until the Bottom text field is set
- Author Lookup -- Bottom right hand side text field
You can either type the name in yourself or look up the author's name in the list of known authors. You'll do both here to see how both methods work.
How to:
- To set the author's name yourself, type your full name in the Author's Full Name (top) textbox beside Author(s) 1.
put image here
Notice that author allows multiple values. When you typed in the Author's Full Name textbox, the Author(s) 2 fields appeared.
- To lookup an author's name, the first letter of their first or last names is typed in the Author Lookup field. A special author has been setup for this tutorial. Type T in the Author Lookup field (bottom right).
- Select Tutorial Test-Author from the list of authors whose names start with T.
put image here
Notice that the Author ID and Author's Full Name fields are automatically filled in when you selected Tutorial Test-Author.
put image here
Enter Additional Notes
|
|
| Note:
|
| Since the Abstract/Summary field does not allow html, the Additional Notes field is often used to hold a description or other content that requires html.
|
How to:
- Type <h1>Simple Content</h1><p>Additional Notes can be used to hold metadata or simple content with or without html tags.</p> in the textbox next to Additional Notes.
put image here
Save Your Work
Look for the buttons at the top and bottom of the entry form that are used to complete the edit workflow.

I know I've mentioned this, but here it goes again...
|
|
| IMPORTANT:
|
| If at any point you decide to stop creating the record, DO NOT navigate away from the creation page using the Back button or one of the navigation links. Instead select the Abandon Workflow button. Otherwise, the new record hangs around in limbo. See Releasing a Locked Record for more information on what to do if you forget to Abandon Workflow.
|
The record still isn't ready to Submit for Approval. So let's just Save it again for now.
- Click either of the Save buttons, which are located at the top and bottom of the entry form.
OnRamp will do some processing to save your record. You will see a message saying the record is saved. Then you will be automatically returned to My OnRamp where you should see your record in the list of Unpublished Items. If you can't find it, try using the instructions in Where's my new record?
|
| Note: If you came to this page by clicking a link other than Previous or Next, then you are outside the normal flow of the tutorial and you should either...
- use the Back button to return to the page you were viewing prior to this page
- OR select a topic from the table of contents at the left.
|
|
|


